What is recommended in this issue is the traditional Chinese medicine image recognition system.

Item Description
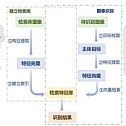
Traditional Chinese medicine recognition system mainly adopts the method of photo uploading on the APP side, and constructs convolutional neural network (CNN) to recognize images, which has the characteristics of high recognition efficiency and accuracy. The functions of the APP include but are not limited to photo recognition, Chinese medicine question and answer (paid consultation), search and query, Chinese medicine properties and efficacy review, prescription intelligent recommendation [under development], etc. This system includes APP side and server side.
Project Introduction
This project consists of six modules:
- medicine-app: APP
- medicine-server: Server
- medicine-crawler: Crawler engineering
- medicine-model: Convolutional neural network
- medicine-util: Utility class
- medicine-dataset: dataset
Technical Introduction
medicine-app
Flutter development
medicine-server Server engineering
Gradle build +SpringBoot framework
One-click launch and deployment document database: MongoDB Full-text search: Elasticsearch + IK Word classifier database
MySQL deep Learning runtime architecture: ONNX Runtime (ONNX Runtime is a cross-platform inference and training machine-learning accelerator)
medicine-crawler
Crawler is mainly used to climb the training set and the detailed information of Chinese medicine , including but not limited to: Chinese medicine name, Chinese medicine form, picture, alias, English name, matching prescription, efficacy and function, clinical application, origin distribution, medicinal parts, sex and taste return to the meridian, pharmacological research, main ingredients, use conscription, harvesting and processing, medicinal material properties and other information.
data structure
- Primary Classification Information of Chinese medicine

- Chinese Medicine details

medicine-model Convolutional Neural network engineering
- Language: Python
- Using TensorFlow deep learning framework, using Keras will significantly reduce the amount of code
Xception function definition:
def Xception(include_top=True,
    weights='imagenet',
    input_tensor=None,
    input_shape=None,
    pooling=None,
    classes=1000,
    **kwargs)

# Parameter
# include_top: Whether to keep the top-level fully connected network
# weights: None means random initialization, i.e. no pre-trained weights are loaded. 'imagenet 'stands for load pretraining weight
# input_tensor: Keras tensor can be filled in as the image input of the model tensor
# input_shape: Optional, valid only if include_top=False, should be a tuple of length 3, indicating the shape of the input image, the image width and height must be greater than 71, such as (150,150,3)
# pooling: specifies pooling when include_top=False. None means no pooling, and the output of the last convolution layer is a 4D tensor. 'avg' stands for global average pooling and 'max' for global maximum pooling.
# classes: Optional, number of categories for picture classification, available only if include_top=True and no pre-training weights are loaded
Build code
Set Xception parameters
Transfer learning parameter weights loading: xception_weights
# Set the width and height of the input image and the number of channels
img_size = (299, 299, 3)

base_model = keras.applications.xception.Xception(include_top=False,
                                                weights='..\\resources\\keras-model\\xception_weights_tf_dim_ordering_tf_kernels_notop.h5',
                                                input_shape=img_size,
                                                pooling='avg')

# Full connection layer, using softmax activation function to calculate probability value, classification size is 628
model = keras.layers.Dense(628, activation='softmax',  name='predictions')(base_model.output)
model = keras.Model(base_model.input, model)

# Lock convolution layer
for layer in base_model.layers:
  layer.trainable = False
Full connection layer training (v1.0)
from base_model import model

# Set training set image size and directory parameters
img_size = (299, 299)
dataset_dir = '.. \\dataset\\dataset'
img_save_to_dir = 'resources\\image-traing\\'
log_dir = 'resources\\train-log'
model_dir = ‘resources\\keras-model\\’
# Use data enhancement
train_datagen = keras.preprocessing.image.ImageDataGenerator(
rescale=1. / 255,
shear_range=0.2,
width_shift_range=0.4,
height_shift_range=0.4,
rotation_range=90,
zoom_range=0.7,
horizontal_flip=True,
vertical_flip=True,
preprocessing_function=keras.applications.xception.preprocess_input)
test_datagen = keras.preprocessing.image.ImageDataGenerator(
preprocessing_function=keras.applications.xception.preprocess_input)
train_generator = train_datagen.flow_from_directory(
dataset_dir,
save_to_dir=img_save_to_dir,
target_size=img_size,
class_mode=‘categorical’)
validation_generator = test_datagen.flow_from_directory(
dataset_dir,
save_to_dir=img_save_to_dir,
target_size=img_size,
class_mode=‘categorical’)
# Early stop method and dynamic learning rate setting
early_stop = EarlyStopping(monitor=’val_loss’, patience=13)
reduce_lr = ReduceLROnPlateau(monitor=’val_loss’, patience=7, mode=’auto’, factor=0.2)
tensorboard = keras.callbacks.tensorboard_v2.TensorBoard(log_dir=log_dir)
for layer in model.layers:
= False
# Model compilation
=‘rmsprop’, loss=’categorical_crossentropy’, metrics=[‘accuracy’])
history = model.fit_generator(train_generator,
steps_per_epoch=train_generator.samples // train_generator.batch_size,
epochs=100,
validation_data=validation_generator,
validation_steps=validation_generator.samples // validation_generator.batch_size,
callbacks=[early_stop, reduce_lr, tensorboard])
# Model export
+ ‘chinese_medicine_model_v1. 0. H5) < / span > < / code > < / pre >
Description of Dependent environment
|
Dependency |
Version |
|
JDK |
11+ |
|
Python |
3.6 |
|
Gradle |
6.5 |
|
TensorFlow |
2.0 |
|
MongoDB |
4.2.2 |
|
MySQL |
8.0+ |
|
Spring Boot |
2.2.2 |
|
Elasticsearch |
7.4.2 |
|
IK word segmentation |
7.4.2 |
|
ONNX Runtime |
1.8.1 |

