The Meteor recommended in this issue is a full stack JavaScript platform for developing modern web and mobile applications

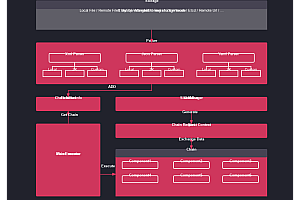
Meteor is a full stack JavaScript platform used for developing modern web and mobile applications. Meteor includes a set of key technologies for building connected client reactive applications, a build tool, and a selection of packages from the Node.js and general JavaScript communities.
Meter characteristics
- Meteor allows you to develop in one language JavaScript in all environments: application servers, web browsers, and mobile devices.
Meteor uses data from the internet, which means the server sends the data instead of HTML, and then the client presents it.
Meteor embraces the ecosystem and brings you the best parts of an extremely active JavaScript community in a cautious and thoughtful manner.
Meteor provides full stack responsiveness, allowing your UI to seamlessly reflect the true state of the world with minimal development effort.
install
Prerequisite and useful information
- If you are using Mac M1 (Arm64 version), you will need to install Rosetta 2 as Meteor uses it to run MongoDB. View how to install here
- Meteor is suitable for Node.js versions>=10 and<=14. For Windows, you need to install Node.js to run the npm installer (note: you can use nvm to manage node versions).
- Meteor supports Windows 7/Windows Server 2008 R2 and higher versions.
- Disabling antivirus software (such as Windows Defender) will improve performance.
- For compatibility, Linux binary files are built using CentOS 6.4 i386/amd64.
- IOS development requires the latest Xcode.
Run one of the following commands from your terminal to install the latest official Meteor version.
For Linux and OS X:
curl https://install.meteor.com/ | shFor Windows (requiring Node.js):
npm install -g meteorTroubleshooting
If your user does not have permission to install global binary files and you need to use sudo, you need to append – unsafe perm after the above command:
sudo npm install -g meteor --unsafe-perm
We strongly oppose the use of Node.js or Meteor with root privileges. If you know what you are doing, please only use sudo to run the above command.
path management
By default, the Meteor installation program adds its installation path (~/. meteor/) to your PATH by updating your. bashrc,. bash_defile, or. zshrc as needed. To disable this behavior, run the following command to install Meteor:
npm install -g meteor --ignore-meteor-setup-exec-path
(or by setting environment variables
npm_config_ignore_meteor_setup_exec_path=true)
Old version on Apple M1
For Apple M1 computers, if you need to run an older version of Meteor (before 2.5.1), you can add the Rosetta prefix as follows:
arch -x86_64 npm install -g meteor
Or select Terminal in the Applications folder, press CMD (⌘)+I, and select the “Open using Rosetta” option.
Running Meteor in Docker
You can also use Docker containers to run Meteor in CI or even local development toolchains.
We do provide Docker images based on Meteor/Meteor base Ubuntu, which are compatible with Node JS and Meteor are pre bundled together and run as local users (rather than root).
Uninstall Meteor
If you use npm to install Meteor, you can remove it by running the following command: meteorological installer uninstall
If you install Meteor using curl, you can remove it by running the following command: rm – rf~/. meteor sudo rm/usr/local/bin/meteor
The documentation for Meteor’s password based account API.
The accounts password software package includes a complete password based authentication system. In addition to the basic username and password based login process, it also supports email based login, including address verification and password recovery email.
The Meteor server uses the bcrypt algorithm to store passwords. If the server’s database is compromised, this helps prevent embarrassing password leaks.
To add password support for your application, run the following command in the terminal:
meteor add accounts-passwordOn the client side, this function logs in as a newly created user after successful completion. On the server, it returns the newly created user ID.
On the client side, you must pass the password with at least one username or email – enough information so that the user can log in again later. If the username or email of an existing user only differs in case, creating User will fail. The callback error. reason will be ‘Username already exists.’ Or ‘Email already exists.’ In the latter case, users can log in or reset their password.
On the server, you do not need to specify a password, but users will not be able to log in until they obtain the password (for example, using the settings Accounts. setPassword). To create an account without a password on the server and still let the user choose his own password, createUser calls with the email option, and then calls
Accounts. sendEnrollmentEmail. This will send the user an email containing a link to set the initial password.
HTTP
HTTP provides HTTP request APIs on both the client and server. To use these features, please add HTTP packets to your project by running them in the terminal:
meteor add http
On the server, this function can run synchronously or asynchronously. If the callback is omitted, it will run synchronously and return the result after the request is successfully completed. If the request is unsuccessful, it will trigger an error. This is useful when making server to server HTTP API calls from the Meter method, as the method can determine the success or failure based on the results of synchronous HTTP calls. In this case, consider using this. unlock() to allow other methods on the same connection to run simultaneously.
On the client side, this function must be used asynchronously by passing callbacks. Please note that some browsers choose to send your request first (to determine CORS header) before sending it.
Supports HTTP and HTTPS protocols. The parameter must be an absolute URL, including the URL protocol and hostname on the server, but can be relative to the current host on the client. The query string URL replaced by this query option. The parameter params specified in the URL will be appended to any query string. For example, using urlof ‘/path? Query ‘and paramsos {foo:’bar’}, the final URL will be ‘/path’? query&foo=bar’。
Meteor.methods({
  checkTwitter(userId) {
    check(userId, String);
    this.unblock();

    try {
      const result = HTTP.call('GET', 'http://api.twitter.com/xyz', {
        params: { user: userId }
      });

      return true;
    } catch (e) {
      // Got a network error, timeout, or HTTP error in the 400 or 500 range.
      return false;
    }
  }
});
Example of asynchronous HTTP call:
HTTP.call('POST', 'http://api.twitter.com/xyz', {
  data: { some: 'json', stuff: 1 }
}, (error, result) => {
  if (!error) {
    Session.set('twizzled', true);
  }
});
Log recording
This logging package provides you with a standardized way to record and display various messages from applications in the console. An additional benefit is that it will show you the location of the trigger log and other data, which helps to quickly locate the source of the message during debugging.
Starting from the installation package:
meteor add logging
Then, you can import the utility from anywhere in the code as follows:
import { Log } from 'meteor/logging'Then, you can call the logging function in one of the following ways:
Log('starting up') // or Log.info('starting up')
Log.error('error message')
Log.warn('warning')
Log.debug('this will show only in development')
In addition to passing in strings, you can also pass in objects. There are almost no exceptions and related special features. Firstly, the following keys are not allowed in the root directory of the object:
'time', 'timeInexact', 'level', 'file', 'line', 'program', 'originApp', 'satellite', 'stderr'On the other hand, there are messages and apps that are also reserved, but they will be displayed in a more prominent way:
Log.info({message: 'warning', app: 'DESKTOP', error: { property1: 'foo', property2: 'bar', property3: { foo: 'bar' }} })It will become:
E20200519-17:57:41.655(9) [DESKTOP] (main.js:36) warning {"error":{"property1":"foo","property2":"bar","property3":{"foo":"bar"}}}The display of each log is color coded. The information is blue, the warning is magenta, debugging is green, and the error is red.
—END—
Open source license: MIT License