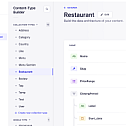
The Strapi recommended in this issue is a leading open-source headless CMS, which is 100% JavaScript, fully customizable, and developer first.

Strapi is a free and open-source headless CMS that provides your content wherever you need it.
- Control your data.With Strapi, you can know where your data is stored and always maintain complete control.
- Self hosted.You can host and expand the Strapi project in your own way. You can choose any hosting platform you want: AWS, Render, Netlify, Heroku, VPS, or dedicated servers. You can expand as you grow, 100% independent.
- Database agnosticism.Strapi is suitable for SQL databases. You can choose your favorite databases: PostgreSQL, MySQL, MariaDB, and SQLite.
- Customizable.You can quickly build logic to perfectly meet your needs by fully customizing APIs, routers, or plugins.
Strapi features
- Modern Management Panel: An elegant, fully customizable, and fully expandable management panel.
- Default security: Reusable policies, CORS, CSP, P3P, Xframe, XSS, etc.
- Plugin oriented: Install authentication system, content management, custom plugins, etc. in seconds.
- Extremely fast: Strapi is built on top of Node.js and provides amazing performance.
- Front end agnosticism: using any front-end framework (React, Vue, Angular, etc.), mobile applications, or even the Internet of Things.
- Powerful CLI: dynamic scaffolding projects and APIs.
- SQL database: suitable for PostgreSQL, MySQL, MariaDB, and SQLite.
Install Strapi
Install using Docker
Docker is an open platform that allows the use of containers (packages that contain all the necessary parts for an application to run, such as libraries and dependencies) to develop, publish, and run applications.
- Create an empty folder.
- Create a docker-compose.yaml file in your empty folder. This is the place to create a new Strapi project, which defines the database and Strapi services to be used.
version: '3'
services:
  strapi:
    image: strapi/strapi
    environment:
      DATABASE_CLIENT: mysql
      DATABASE_HOST: mysql
      DATABASE_PORT: 3306
      DATABASE_NAME: strapi
      DATABASE_USERNAME: strapi
      DATABASE_PASSWORD: strapi
      DATABASE_SSL: 'false'
    volumes:
      - ./app:/srv/app
    ports:
      - '1337:1337'
    depends_on:
      - mysql

  mysql:
    image: mysql
    command: mysqld --default-authentication-plugin=mysql_native_password
    volumes:
      - ./data:/var/lib/mysql
    environment:
      MYSQL_ROOT_PASSWORD: strapi
      MYSQL_DATABASE: strapi
      MYSQL_USER: strapi
      MYSQL_PASSWORD: strapi
- Use the following command to pull the latest image:
docker-compose pullRun Strapi
To run a Strapi project created using Docker, use one of the following commands:
# Execute Docker image detaching the terminal
docker-compose up -d

# Execute Docker image without detaching the terminal
docker-compose up
DigitalOcean One Click Installation
DigitalOcean is a cloud platform that helps developers deploy and scale applications by providing an Infrastructure as a Service (IaaS) platform.
Create a Strapi project
- Go to the Strapi page on the DigitalOcean marketplace.
- Click the Create Strapi Droplet button.
- Keep the selected ‘Shared CPU Basic’ plan.
- Select ‘Regular Intel with SSD’ as the CPU option.
- Choose your virtual machine size (at least 2 GB/1 CPU).
- Choose a data center area (closest to you or your target area).
- Add a new SSH key. You can follow this guide to open a new window
- Give your virtual machine a host name.
- Click to create a Droplet. Droplet startup may take 30 seconds to a few minutes, while completing Strapi installation may take a few minutes.
Run Strapi
Your Strapi application on DigitalOcean will run in development mode. It is not recommended to use this application directly in production.
To access your Strapi application:
- Go to the droplet list on DigitalOcean (open a new window) and log in.
- Click on the droplet name for your Strapi application.
- Copy the public IPv4 address of the Droplet.
- Use this address to access the Strapi application.
The first visit to the Strapi application page will require the creation of the first administrator user.
Project Structure
The default structure of a Strapi project created without starting the CLI is as follows:
. # root of the application
├──── .cache # files used to build the admin panel
├──── .tmp
├──── build # build of the admin panel
├──── config # API configurations
│     ├ api.js
│     ├ admin.js
│     ├ cron-tasks.js
│     ├ database.js
│     ├ middlewares.js
│     ├ plugins.js
│     └ server.js
├──── database
│     └──── migrations
├──── node_modules # npm packages used by the project
├──── public # files accessible to the outside world
│     └──── uploads
├──── src
│     ├──── admin # admin customization files
│           ├──── extensions # files to extend the admin panel
│     │     ├ app.js
│     │     └ webpack.config.js
│     ├──── api # business logic of the project split into subfolders per API
│     │     └──── (api-name)
│     │           ├──── content-types
│     │           │     └──── (content-type-name)
│     │           │           └ lifecycles.js
│     │           │           └ schema.json
│     │           ├──── controllers
│     │           ├──── middlewares
│     │           ├──── policies
│     │           ├──── routes
│     │           ├──── services
│     │           └ index.js
│     ├──── components
│     │     └──── (category-name)
│     │           ├ (componentA).json
│     │           └ (componentB).json
│     ├──── extensions # files to extend installed plugins
│     │     └──── (plugin-to-be-extended)
│     │           ├──── content-types
│     │           │     └──── (content-type-name)
│     │           │           └ schema.json
│     │           └ strapi-server.js
│     ├──── middlewares
│     │     └──── (middleware-name)
│     │           ├ defaults.json
│     │           └ index.js
│     ├──── plugins # local plugins files
│     │     └──── (plugin-name)
│     │           ├──── admin
│     │           │     └──── src
│     │           │           └ index.js
│     │           ├──── server
│     │           │     ├──── content-types
│     │           │     ├──── controllers
│     │           │     └──── policies
│     │           ├ package.json
│     │           ├ strapi-admin.js
│     │           └ strapi-server.js
│     ├─── policies
│     └ index.js # include register(), bootstrap() and destroy() functions
├ .env
└ package.json
configuration
The application configuration is located at/ In the config folder (see project structure). All configuration files are loaded at startup and can be accessed through the configuration provider.
If/ The config/server. js file has the following configuration:
module.exports = {
  host: '0.0.0.0',
};
Server. host can access the key through the following methods:
strapi.config.get('server.host', 'defaultValueIfUndefined');deploy
General guidelines
precondition
In order to provide the best environment for Strapi, there are some requirements that apply to development (local) as well as staging and production workflows.
Please note that Node LTS (v12 or V14) will never support odd numbered versions
Nodes (such as v13, v15). Any content included with NPM v6 or LTS node versions
A typical standard build tool for your operating system (build essential software packages on most Debian based systems) to
Less than 1 CPU core (strongly recommended at least 2)
At least 2 GB of RAM (medium recommended 4)
The recommended minimum storage space or 32 GB of available space for your operating system
Supported database versions
MySQL >= 5.7.8
MariaDB >= 10.2.7
PostgreSQL >= 10
SQLite >= 3
Supported operating systems
Ubuntu>=18.04 (LTS only)
Debian >= 9.x C
entOS/RHEL >= 8
MacOS Mojave or later version (does not support ARM)
Strapi plugin
Automatic plugin discovery
Strapi will automatically load plugins installed using npm. In the background, Strapi scans each file of the package. json project dependency and looks for the following declaration:
"strapi": {
  "kind": "plugin"
}
—END—
Open source license: MIT License

