The RIL recommended in this issue is a wireless communication module (GSM/GPRS/CatM1/NB-Iot) management software specially developed for embedded platforms. It is different from other large frameworks (such as Android RIL, Wince RIL) in that it is designed to be applied to resource-constrained iot terminal devices (MCU + wireless module solution), and provides the basic functions required for iot communication, including network registration, connection management, SMS sending and receiving, and Socket communication.
Basic features
- includes network registration, connection, SMS sending and receiving, Socket communication management and other basic functions.
- Module drivers are managed in plug-in mode. Multiple modules can be mounted and adapted to the same system, and module drivers can be dynamically selected.
- can be adapted to different RTOS platforms with simple modifications.
- Built-in exception handling mechanism in a variety of cases to ensure stable operation of the module.
- Built-in common components, such as HTTP file download with breakpoint continuation function, TFTP transfer, MQTT, etc.
System requirements
In order for RIL to function properly, the target system must meet the following requirements :
- ROM resources: at least 13.5K Bytes(depending on the number of mounted modules and components used)
- RAM resource: at least 1.2K Bytes(depending on the number of sockets created)
- RTOS and stack: RIL needs to run in two tasks with a stack of at least 256 Bytes for each task
- Compiler: Since RIL uses some features of C99 (flexible arrays, inline), the compiler needs to enable support for C99. For IAR, it is turned on by default, while Keil MDK requires manual addition of compilation options (–c99 –gnu)
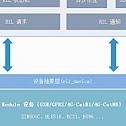
Software Architecture

Environment Preparation
The following platform and software and hardware environment used by the demo project:
- MCU: STM32F401RD
- IDE: IAR7.4, Keil MDK 4.72a
- Module : EC21
- RTOS: Free-RTOS V202012.00
Project configuration
The following view shows the contents of all the RIL subdirectories, where the ril subfolders contain ril service-related functions, module drivers, and use cases. demo is used for ril demonstration projects.
ril
│
|───docs          Usage document
|───demo          Demonstration project
│   │───driver    Driver file
│   │───lib       MCU peripheral library file
│   │───misc      Common function library
|   |───os        Operating system dependent
|   |───project   Engineering document
|   └───user
│       └─── samples  Demonstration case(TCP/UDP/HTTP/SMS)
│       └─── tasks    Demonstration case
└───ril
    │───build    Project file for output RIL library file
    │───case     Built-in component(HTTP/TFTP/MQTT)
    │───modules  Module driver file(ec21,bg96,hl8518 ...)
    │───common   Common library file
    |───core     ril kernel service related
    └───port     RPorts related to TOS
.h header file used by the project
When using, you should ensure that the project header file path contains the following directory:
- ril/core/inc
- ril/common/inc
- ril/port
- ril/case/(optional directory, do not include this if you do not need ril’s built-in components)
.c source files used by the project
In general, you need to include the RIL kernel c file, the common library file, the module driver file to be used, and optional built-in components.
-
- All c files in folder ril/core/src
- All c files in folder ril/common/src
- The module driver used. Select the corresponding file
in ril/modules according to the hardware needs.
-
- RTOS system related, select the corresponding file
from folder ril/port selected according to OS platform
Generate library file
In order to speed up the compilation of your project, you can compile the RIL source package into library form in advance. The ril/build directory provides compilation projects for IAR and MDK libraries. Before entering the project, you need to select the corresponding target platform (such as Cotext-M4). Then click the build or make button and the corresponding library file is generated under the ril/output directory.
Start RIL
A wireless module needs to go through a series of complex steps before connecting to the server, such as power on, SIM card detection, frequency band and standard configuration (if necessary), network registration, PDP establishment and activation, etc. The general flow chart is as follows:

Readers only need to have a general understanding of the above process, which has been automatically completed by RIL’s internal state machine, and users only need to follow the following steps to operate.
- Create RIL tasks, including the main task and AT command parsing task
- Initializing RIL with interface adapter and configuration parameters
- Select the module model for the hardware
- Open module device
- Enable network connection