This issue recommends a multi-person real-time face detection and face recognition system based on multi-task Convolutional network (MTCNN) and Center-Loss.
Introduction to DFace
DFace is an open source deep learning face detection system and face recognition system. All features are developed using the pytorch framework. pytorch is a deep learning framework developed by facebook that includes some interesting advanced features such as automatic derivation, dynamic composition, and more. DFace naturally inherits these advantages, making its training process more simple and convenient, and the implementation of the code can be more clear and understandable.
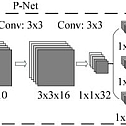
MTCNN structure


Environment and modules
DFace has two main modules, face detection and face recognition first need to build a pytorch and cv2 python environment
rely on
- cuda 8.0
- anaconda
- pytorch
- torchvision
- cv2
- matplotlib
git clone https://github.com/kuaikuaikim/DFace.gitHere I provide an anaconda environment dependency file, environment.yml (windows please use environment-win64.yml), which makes it easy for you to build your own virtual environment.
cd dface

conda env create -f environment.yml
Added python search module path
export PYTHONPATH=$PYTHONPATH:{your local DFace root path}Face recognition and detection
Train the mtcnn model
MTCNN has three main networks, called PNet, RNet and ONet. Therefore, our training process also needs to be carried out in three steps. In order to achieve better results, the currently trained network will rely on the previous trained network to generate data. All FACE datasets come from WIDER FACE and CelebA. WIDER FACE only provides a large amount of face border location data, while CelebA contains face key point location data.
- Create a temporary directory of dface training data corresponding to all of the following parameter names –dface_traindata_store
mkdir {your dface traindata folder}- Generate PNet training data and annotation files
python dface/prepare_data/gen_Pnet_train_data.py --prefix_path {Annotate the directory prefix of the image in the file,It's the wider face of the picture} --dface_traindata_store {Temporary directory of dface training data created earlier} --anno_file {wider faceNote file, can not fill, default use anno_store/wider_origin_anno.txt}- Merge annotation files out of order
python dface/prepare_data/assemble_pnet_imglist.py- Train the PNet model
python dface/train_net/train_p_net.py- Generate RNet training data and annotation files
python dface/prepare_data/gen_Onet_train_data.py --prefix_path {Annotate the directory prefix of the image in the file,It's the wider face of the picture} --dface_traindata_store {之前创建的dface训练数据临时目录} --anno_file {wider face Note file, can not fill, default useanno_store/wider_origin_anno.txt} --pmodel_file {Previously trained Pnet model file} --rmodel_file {Previously trained Rnet model file}- Generate ONet key point training data and annotation files of facial features
python dface/prepare_data/gen_landmark_48.py- Merge annotation files out of order (including key points of facial features)
python dface/prepare_data/assemble_onet_imglist.py- Train the ONet model
python dface/train_net/train_o_net.pyPC installation
Installation package download address:
https://developer.nvidia.com/rdp/cudnn-download
Choose one of the following two compression packages based on your system:
- cuDNN v6.0 Library for Windows 7
- cuDNN v6.0 Library for Windows 10
Local computer download file name:
cudnn-8.0-windows10-x64-v6.0.zip
Configuration procedure:
- Unzip cudnn-8.0-windows10-x64-v6.0.zip
- The extracted file directory cuda was copied to a custom location on my computer, and I stored it in the D:\Tools directory
- Add environment variable
- Add path: Path 1 D:\Tools\cuda\bin path 2 D:\Tools\cuda\lib\x64
- Step: Right-click My Computer – > Properties – > Advanced System Settings – > Environment Variables – > System Variables – > Add Path to Path variable
install:
- Double-click the installation package
- Click Next
- Click on I Agree
- In the above box select All Users(requires admin privileges) and click Next
- Select the installation path, my installation path is D:\Tools\Anaconda3, click Next

- The above check box defaults, click Install
- Keep Next until the end
- After the installation is complete, add the path where the Scripts directory in the Anaconda3 directory is located to the environment variable. Add methods such as cuda to add consistency. The path I added is D:\Tools\Anaconda3\Scripts
Running effect drawing