This issue recommends an open source intelligent switch platform – kwswitch.

The kwswitch intelligent switch platform includes the server side, hardware side, PC side and Android side. The hardware uses the ESP8266 module, the cost is relatively low, you can play the imagination, with a variety of sensors, to achieve their own intelligent terminal.
Application Scenario
The application scenario of the intelligent switch is relatively wide, and the equipment that can be used at home with power can be matched with the module, upgraded to the Internet version, and the network control. Common is smart switches, smart sockets and smart lights, with soil moisture sensors can achieve intelligent watering, with temperature and humidity sensors can monitor temperature and humidity, other sensors such as: touch switch, raindrop detection, sound sensors, light sensors, smoke sensors, flame alarm, human body sensing and so on.
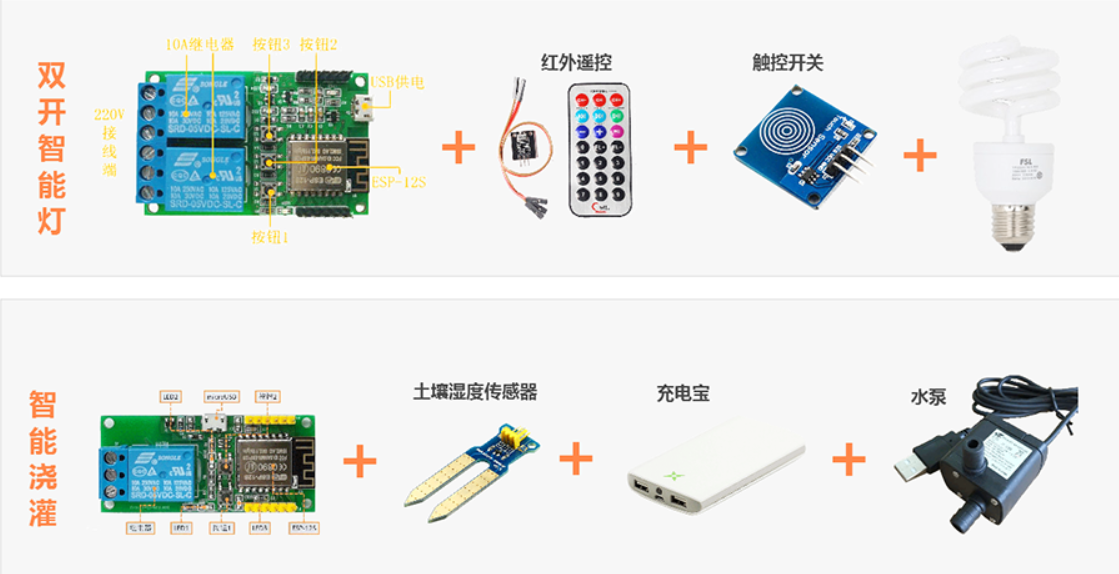
Supported function
- Remote control
- Power failure memory
- Touch switch
- Infrared remote control
- Temperature and Humidity monitoring
- Local control
- Single and double relay support
- Intelligent distribution network (long press the configuration button to enter)
- No networking mode (double-click the configuration button to switch)
Technical stack
- The current backend of this project is based on the ROI Rights management system
- Switch hardware using Shell iot Wifi relay module
- Android uses Lexin’s EspTouch and iFlytek’s Voice SDK
Function architecture diagram:

Project structure:

Back-end:
- Related technologies: Spring boot, MyBatis, Spring Security, Jwt, Mysql, Redis, Mongodb, MQTT
- Development Tools: IDEA
Front end:
- Related technologies: ES6, Vue, Vuex, Vue-Router, VUe-CLI, Axios, Element-ui
Development tools: Visual Studio Code
Android:
- Related technologies: Smartconfig, GSON, OkHttp, iFlytek Voice
- Development tools: Android Studio
Hardware:
- Related technologies: Arduino, ESP8266 core for Arduino, OneButton, IRromoteESP8266, PubSubClient
- Development tools: Arduino IDE, Visual Studio Code
- Auxiliary tools: USB to TTL download cable, AC-DC buck module (optional), infrared remote control module (optional), DHT11 Temperature and humidity sensor (optional), touch switch (optional)
- Hardware picture: Hardware picture from the official website

- Hardware circuit diagram:

- Circuit wiring diagram (default 5V voltage, if you want to connect to 220V AC, you need to match an AC-DC buck module) :

Installation and deployment
The following is the command for installing related containers in linux. In windows, change the line break symbol and the mount volume path in the command. These commands are easy to develop and deploy, or you can use dockerfile, docker-compose.yml, or your own image. Of course, it is possible not to use docker, but it is more troublesome to install applications one by one.
- mysql installation (with account and password)
1.安装软件
docker run \
   --name mysql \
    --publish 3306:3306 \
    --volume /var/data/mysql/mysql:/var/lib/mysql \
    --env MYSQL_DATABASE="databaseName" \
    --env MYSQL_USER="root" \
    --env MYSQL_ROOT_PASSWORD=123456 \
    --restart always \
    --detach \
 mysql:5.7 \
     --character-set-server=utf8 \
     --collation-server=utf8_unicode_ci

2.Enter container
docker exec -it containId /bin/bash

3.Modify the configuration file to set the encoding
tee /etc/mysql/conf.d/mysql.cnf <<-'EOF'
[client]
default-character-set=utf8

[mysql]
default-character-set=utf8
EOF

4. Optional < / span > : < span class = "HLJS - string" > set the mysql lowercase mode, vim/etc/mysql/mysql. Conf., d/mysql. CNF, under/mysqld to join a line: lower_case_table_names=1- redis installation (with password)
docker run \
  --name redis \
  --restart always \
   --publish 6379:6379 \
  --volume /var/data/redis/data:/data \
  --detach \
redis \
  --requirepass "123456" \
--appendonly yes- mongodb installation (with account password)
docker run \
    --name mongo \
    --env MONGO_INITDB_ROOT_USERNAME=root \
    --env MONGO_INITDB_ROOT_PASSWORD=123456 \
    --volume /var/data/mongodb:/data/db \
    --publish 27017:27017 \
    --restart unless-stopped \
    --detach \
mongo:4.0

Tip: When mongodb is used, create a library first, and then create users and roles in the corresponding library. Otherwise, the created users cannot connect to the corresponding database. - mosquitto install (Broker with account password, Mqtt)
1.Install software
docker run \
   --name mosquitto \
   --privileged \
   --publish 1883:1883 \
   --publish 9001:9001 \
   --volume /var/data/mosquitto/data:/mosquitto/data \
   --volume /var/data/mosquitto/log:/mosquitto/log \
   --restart always \
   --detach \
eclipse-mosquitto


2.To enter the container:docker exec -it name sh

3. Edit the configuration file:vi /mosquitto/config/mosquitto.conf
  # Turn anonymous mode off
  allow_anonymous false
  # Specify password file
  password_file /mosquitto/config/pwfile.conf

4.Generate password:
  # Create a user using mosquitto_passwd command with the first admin being the username and the second admin being the password
  mosquitto_passwd -b /mosquitto/config/pwfile.conf admin admin

5. Exit the container and restart the container:
# Exit container
exit
# Restart container
docker restart mosquitto
Presentation


You can read more on your own.




![[Open Source] Free and open-source MES system, exquisite visual digital large screen, supports low code large screen design](https://ictcoder.com/wp-content/themes/ceomax/timthumb.php?src=https://ictcoder.com/wp-content/uploads/2023/08/2023100608185178-300x200.jpg&w=300&h=200&zc=1&a=c&q=100&s=1)
