Get started with deployment
Step 1: Download the editor
Method 1: Complete installation package (recommended)
Neditor.tar.xz
Method 2: Install npm
npm i @notadd/neditor -S
Method 3: Compile and install
git clone https://github.com/notadd/neditor.gi
npm install
npm run build
Step 2: Open the index.html in your browser
Go to the directory dist and open the file index.html using a browser
use
Create a demo file
Unzip the downloaded package, create a demo.html file in the unzipped directory, and fill in the following html code
<!DOCTYPE HTML>
<html lang=”en-US”>
<head>
<meta charset=”UTF-8″>
<title>ueditor demo</title>
</head>
<body>
<!– Load the editor’s container –>
<script id=”container” name=”content” type=”text/plain”>
Here write your initialization content
</script>
<!– Config file –>
<script type=”text/javascript” src=”ueditor.config.js”></script>
<!– Editor source code file –>
<script type=”text/javascript” src=”ueditor.all.js”></script>
<!– Instancing Editor –>
<script type=”text/javascript”>
var ue = UE.getEditor(‘container’);
</script>
</body>
</html>
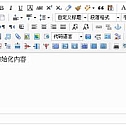
Open the demo.html in your browser
If you see an editor like this, congratulations, your first deployment was successful!

Pass in the custom parameters
The editor has a number of customizable parameters that can be passed to the editor when instantiated:
var ue = UE.getEditor(‘container’, {
autoHeight: false
});
Set and read the content in the editor
The contents of the editor can be set and read through the getContent and setContent methods
var ue = UE.getContent();
It’s best to do things with the editor after the editor is ready
ue.ready(function() {
Set the contents of the editor
ue.setContent(‘hello’);
Get the html content, return: <p>hello</p>
var html = ue.getContent();
Get plain text content and return: hello
var txt = ue.getContentTxt();
});
Customize toolbar icons
Description of how to modify a configuration item
How to modify the configuration item: 1. Method 1: Modify the toolbars in ueditor.config.js 2. Method 2: Enter the toolbars parameter when instantiating the editor
var ue = UE.getEditor(‘container’);
Simple list
toolbars: [
[‘fullscreen’, ‘source’, ‘undo’, ‘redo’, ‘bold’]
]
Multi-line lists
toolbars: [
[‘fullscreen’, ‘source’, ‘undo’, ‘redo’],
[‘bold’, ‘italic’, ‘underline’, ‘fontborder’, ‘strikethrough’, ‘superscript’, ‘subscript’, ‘removeformat’, ‘formatmatch’, ‘autotypeset’, ‘blockquote’, ‘pasteplain’, ‘|’, ‘ forecolor’, ‘backcolor’, ‘insertorderedlist’, ‘insertunorderedlist’, ‘selectall’, ‘cleardoc’]
]

Two lines
Description of the deployment package directory
The following table describes the directory structure of the decompressed file of the deployment packageshow

- dialogs: The resources and JS files corresponding to the dialog box pop up
lang: The file that the editor displays internationally
PHP or JSP or ASP or NET: Background files that involve server-side operations
themes: style images and style files
third-party: third-party plug-ins (including code highlighting, source code editing, etc.)
ueditor.all.js: The result of the development version code merge, the packaging file of all files in the directory
ueditor.all.min.js: ueditor.all.js a condensed version of the file, which is recommended for general deployment
ueditor.config.js: Editor’s configuration files, suggestions, and editor instantiation pages are placed in the same directory
ueditor.parse.js: The edited content displays page references, and styles such as tables, lists, and code highlights are automatically loaded
ueditor.parse.min.js: ueditor.parse.js a compressed version of the file, which is recommended to be used when the content display page is officially deployedDescription of the directory of the source code package

Secondary development method
You don’t need to make any changes to the UEditor code, just develop custom features outside of UEditor through the secondary development interface provided by UEditor. This development method not only avoids modifying the UEditor source code and facilitates future UEditor upgrades, but also allows the custom functionality to be maintained in a file or directory through the interface, which is convenient for future maintenance.
Deploy custom features
For the secondary development of UEditor, it is generally more about adding buttons, drop-down baskets or adding a dialog. Based on these general methods, I wrote three types of custom demos in the _examples directory.
addCustomizeButton.js Add a button
addCustomizeCombox.js Add a drop-down box
addCustomizeDialog.js Add a pop-up layer
In addition to adding an additional HTML page to add the popup layer, all the functional code that needs to be added and modified is maintained in a JS file. Ways to use files:
<script type=”text/javascript” charset=”utf-8″ src=”../ueditor.config.js”></script>
<script type=”text/javascript” charset=”utf-8″ src=”editor_api.js”>
</script>
<script type=”text/javascript” charset=”utf-8″ src=”../lang/zh-cn/zh-cn.js”></script>
<!– add button –>
<script type=”text/javascript” charset=”utf-8″ src=”addCustomizeButton.js”></script>
The newly added button is complete. When you instantiate the editor, you don’t need to add any additional code.
Development details
Now that we’ve talked about how to deploy your features, this section will tell you what interfaces UEditor provides to extend your functionality outside of the editor.
UE.registerUI(‘uiname’, function(editor, uiname) {
//do something
}, [index, [editorId]]);
Considering that everyone’s function basically extends a UI and what this UI does, UEditor provides an interface called registerUI, which allows developers to dynamically inject extended content.
uiname, is the name you gave to the newly added UI, here it can be 1 or more, “uiname” and the latter is “uiname1 uiname2 uiname3”
function, is what you actually have to do, here provide two parameters, editor is the editor instance, if you have multiple editor instances, then after each editor is instantiated, this function will be called, and the editor will be passed in, uiname, the name you gave to the ui, if you added more than one in the front, the function will be called many times, and each ui name will be passed in. If a function returns a UI instance, that UI instance is added to the toolbar by default. Of course, it is also possible to return no UI. For example, if you want to monitor the selectionchange event and pop up the floating layer in some scenarios, you don’t need to return any UI.
index, is the position you want to put in the toolbar, and the default is to put it at the end
editorId, when you have multiple editor instances on your page, you want to extend this ui to that editor instance, where editorId is the id passed in when you initialize the editor, the default is that each instance will join your extension
Add a button
UE.registerUI(‘button’, function(editor, uiName) {
When the registration button is executed, the command command will have a fallback action by default
editor.registerCommand(uiName, {
execCommand: function() {
alert(‘execCommand:’ + uiName)
}
});
Create a button
var btn = new UE.ui.Button({
The name of the button
name: uiName,
prompt
title: uiName,
Add extra styling and specify the icon icon, which is a duplicate icon by default
cssRules: ‘background-position: -500px 0; ‘,
Commands that are executed when clicked
onclick: function() {
You don’t need to execute commands here, you can do your own operations
editor.execCommand(uiName);
}
});
When the point is made on the edit, the button does a state reflection
editor.addListener(‘selectionchange’, function() {
var state = editor.queryCommandState(uiName);
if (state == -1) {
btn.setDisabled(true);
btn.setChecked(false);
} else {
btn.setDisabled(false);
btn.setChecked(state);
}
});
Since you’re adding a button, you need to return this button
return btn;
});