Dory-Engine is a very simple and scary application cloud engine, doryctl is a command line management tool of Dory-Engine.
Architectural design

Core architecture
DORY is a stateless application service with a task scheduler.
All DORY tasks are executed in the executor remote docker, which connects to the remote docker and delivers various compilation and build tasks, image packaging tasks, and code scanning tasks, and shares the load of the execution tasks to the remote executor.
DORY, which is the task scheduler, and executor, which is the task executor, are both distributed architectures, which can be horizontally scaled according to the load of the scheduled task and the load of the execution of the task, which is highly elastic.
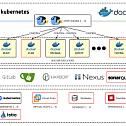
DORY takes over each component of the DevOps continuous delivery toolchain and automatically enables the configuration of relevant components for the project, including code repository (supports Gitlab and Gitea), container registry (supports Harbor), dependency and artifact repository (supports Nexus), code scanning (supported by Enterprise Edition, supports Sonarqube), and image scanning (supported by Enterprise Edition, supports Anchore-Engine).
DORY can manage multiple kubernetes clusters, OpenStack clusters (supported by Enterprise Edition), VmWare clusters (supported by Enterprise Edition), and multiple hosts (supported by Enterprise Edition), and deploy compiled and packaged microservices to Kubernetes environments or various host environments.
Enterprise Edition allows multiple microservices of an application to support three hybrid grayscale release modes: blue-green release, canary release, and AB test.
DORY can manage multiple databases, and execute database executions or rollback scripts in multiple databases (supported by Enterprise Edition).
DORY can be deployed in a kubernetes cluster or docker-compose, and kubernetes is recommended for deployment in the production environment
This architecture has the following features:
Distributed: Dory-Engine uses a stateless design architecture to easily implement horizontal scaling and scaling. The remote step executor (Docker) can be horizontally scaled according to workloads to achieve high elasticity.
Easy scalability: Container technology allows steps to support various execution environments and flexibly expand the application process to the cloud.
Multi-cloud orchestration: You can take over multiple different cloud-native environments, host environments, and various database environments at the same time, and publish applications to multiple different environments.
Collaborative governance: Taking over each component of the DevOps continuous delivery toolchain and automatically opening and configuring each component and cloud-native environment, it has never been easier to migrate applications to the cloud.
The basic services that DORY depends on

- DORY uses MongoDB as the database, Redis as the cache, and OpenLDAP as the user center.
DORY can connect multiple remote dockers as executors at the same time
DORY and all executors use a set of shared storage, and all kinds of files generated during pipeline execution will be stored in the shared storage, and you can set the switch to clean up the temporary data of the pipeline execution process after the pipeline execution is completed.
Get started quickly

Install the architecture
Two installation modes
kubernetes
Deploy DORY in kubernetes and automatically create two different namespaces to run DORY-related services and harbor image repositories
DORY’s executor can be launched at different nodes in a kubernetes cluster
docker-compose
Use docker-compose to deploy DORY, and automatically create two different docker-compose.yaml for running DORY-related services and harbor image repository
All executors of DORY can only be started on the same node
In this issue, we only introduce the docker-compose installation method
Warning: The DORY service installation process requires administrator privileges, it is recommended to run doryctl as root user for DORY installation, before installation, please ensure that you have an available kubernetes cluster, and all pods in the kube-system namespace are in the Running state. (For details, see doryctl install check –mode docker command output requirements)
Automatic mode installation: Automatically complete the installation of DORY-related components, and complete several component configurations according to the instructions after the installation is completed
# 1. docker-compose mode pre-installation check
doryctl install check –mode docker
# 2. Pull the image required for the installation process from Docker Hub
doryctl install pull
# 3. Obtain an example of the configuration parameters for the docker-compose installation
doryctl install print –mode docker > install-config-docker.yaml
# 4. Manually modify the installation configuration parameters, paying special attention to information such as the installation directory and Kubernetes connection parameters
vi install-config-docker.yaml
# 5. Automatically install DORY in docker-compose mode
doryctl install run -o readme-install-docker -f install-config-docker.yaml
# 6. After the installation is complete, the relevant configuration instructions will be displayed, and the DORY deployment can be completed after the relevant configuration is completed
Manual installation: If you need to manually modify the relevant deployment files during the installation process, you can use the manual installation mode, and the installation command will automatically generate all installation instructions and installation configuration files, and then the user can manually complete the installation according to the output installation instructions
# 1. docker-compose mode pre-installation check
doryctl install check –mode docker
# 2. Pull the image required for the installation process from Docker Hub
doryctl install pull
# 3. Obtain an example of the configuration parameters for the docker-compose installation
doryctl install print –mode docker > install-config-docker.yaml
# 4. Manually modify the installation configuration parameters, paying special attention to information such as the installation directory and Kubernetes connection parameters
vi install-config-docker.yaml
# 5. Get all the configuration files and scripts for manually installing DORY, and output the relevant help guides
doryctl install script -o readme-install-docker -f install-config-docker.yaml
[WARNING] 2022-01-11 10:33:43: all scripts and config files located at: readme-install-docker
[WARNING] 2022-01-11 10:33:43: 1. please follow readme-install-docker/README-docker-install.md to install dory by manual
[WARNING] 2022-01-11 10:33:43: 2. please follow readme-install-docker/README-docker-config.md to config dory by manual after install
[WARNING] 2022-01-11 10:33:43: 3. if install fail, please follow readme-install-docker/README-docker-reset.md to stop all dory services and install again
# 6. According to the instructions, enter the relevant output directory, view the guidance file, and manually complete the installation according to the guidance file.
cd readme-install-docker
ls -alh
drwx—— 5 root root 4.0K Jan 11 10:33 .
dr-xr-x—. 12 root root 4.0K Jan 11 10:33 ..
drwx—— 4 root root 4.0K Jan 11 10:33 dory
drwx—— 5 root root 4.0K Jan 11 10:33 harbor
-rw——- 1 root root 2.3K Jan 11 10:33 project-data-alpine.yaml
-rw——- 1 root root 2.9K Jan 11 10:33 README-docker-config.md
-rw——- 1 root root 7.5K Jan 11 10:33 README-docker-install.md
-rw——- 1 root root 619 Jan 11 10:33 README-docker-reset.md
Create a project
According to the doryctl installation and configuration guide, open the dory-dashboard management interface, and add a project to the management console

- After the project is activated, DORY’s project configuration, demo code repository, container registry, dependency and artifact repository will be automatically created, and the project’s kubernetes namespace will be automatically created and the project’s persistent storage will be allocated.
Open the project repository and the Documents directory contains the documentation for the demo project
├── BuildDepends # Compile and build dependencies configuration storage directory
│ ├── .config
│ ├── .gradle
│ ├── .m2
│ ├── .npmrc
│ ├── .pip
│ ├── README.md
│ └── go
├── Codes # Demo code storage directory
│ └── Backend
│ ├── tp1-gin-demo # An independent web interface service written in the Go language
│ ├── tp1-go-demo # Web interface service written in Go language, and several other services form a microservice call chain
│ ├── tp1-gradle-demo # Functions written in Groovy are only used for compiling, building, and testing, and are not packaged and published
│ ├── tp1-node-demo # Web interface service written in javascript language, and several other services form a microservice call chain
│ ├── tp1-python-demo # The web interface service written in python language forms a microservice call chain with several other services
│ └── tp1-spring-demo # Web interface service written in Java language, and several other services form a microservice call chain
├── Documents # Demonstrate the description of each microservice in the project
│ ├── README.md
└── README.mdPull the project code, modify the code, and execute the application migration process
# Pull code from the repository
git clone http://${YOUR_GITREPO_URL}/${YOUR_PROJECT_NAME}/${YOUR_PROJECT_NAME}.git
cd ${YOUR_PROJECT_NAME}# Set the remote branch as the local branch
git branch -r | grep -v ‘->’ | while read remote; do git branch –track “${remote#origin/}” “$remote”; done# Check the local branch, now the hotfix branch has been added
git branch –list
* develop
hotfix# Modify any code and commit it
git commit -a -m ‘my first commit’# Push the code to the code repository and automatically trigger the pipeline
git push origin