Source code type: C/S Development environment: VS2022+SQLSERVER 2016 Development language: C #, technical consultation QQ: 3290475595
Price: 39800 yuan, permanent upgrade and maintenance.
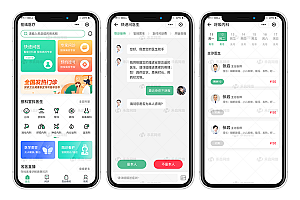
The entire system includes the following 6 terminals:
Number terminal
Integrated display screen
Triage screen
Doctor calling terminal
Management backend
Nurse triage desk
Please refer to the subsequent image display for details
The hospital queuing and calling system is an integrated self-service solution tailored specifically for hospitals. On the basis of solving the problem of integration with the Hospital Information Management System (HIS) and bank card system, it fully meets the needs of hospital self-service diagnosis and treatment card issuance, registration, payment, inquiry, recharge, and receipt printing. At the same time, it can also realize the needs of self-service laboratory test form printing, self-service laboratory test report printing, self-service hospitalization expense list printing, etc., improve medical quality and efficiency, effectively avoid patients waiting in line for a long time and delay in obtaining test reports by mistake.
Hospital queuing and calling
1. Source code description
1.1 triage management end
1.1.1 Department Management
After logging into the triage management client, click on “Department Management” in the main interface menu to enter the department management interface.
2. Enter the conditions and click the [Query] button to search for department information.
3. Click on a department record in the query results, modify the information in the department information below, and click the [Save] button to save it.
4. Click on a department record in the query results and click the [Delete] button to delete it.
5. Click the [Add] button, enter the department information in the department information, and then click the [Save] button to save the newly added department information.
1.1.2 Consultation Room Management
After logging in to the triage management client, click on “Room Management” in the main interface menu to enter the room management interface.
2. Select the department on the left and enter the criteria on the right, then click the 【 Search 】 button to search for consultation room information.
3. Click on a clinic record in the query results, modify the information in the clinic information below, and click the [Save] button to save it.
4. Click on a clinic record in the query results and click the [Delete] button to delete it.
5. Click the [Add] button, enter the clinic information in the clinic information, and then click the [Save] button to save the newly added clinic information.
1.1.3 Doctor Management
After logging into the triage management client, click on ‘Doctor Management’ in the main interface menu to enter the doctor management interface.
2. Select the consultation room on the left and enter the conditions on the right, then click the 【 Search 】 button to search for doctor information.
3. Click on a doctor record in the query results, modify the information in the doctor information below, and click the [Save] button to save it.
4. Click on a doctor record in the query results and click the [Delete] button to delete it.
5. Click the [Add] button, enter the consultation room information in the doctor information, and then click the [Save] button to save the newly added doctor information.
1.1.4 Patient Management
After logging into the triage management client, click on ‘Patient Management’ in the main interface menu to enter the patient management interface.
2. Select the doctor on the left and enter the criteria on the right, then click the 【 Search 】 button to search for patient information.
3. Click on a patient record in the query results, modify the information in the patient information below, and click the [Save] button to save it.
4. Click on a patient record in the query results and click the [Delete] button to delete it.
5. Click the [Add] button, enter the patient information in the patient information, and then click the [Save] button to save the newly added patient information, and the queue receipt will be automatically printed.
6. Clicking on ‘Print Receipt’ will reprint the queue receipt for the currently selected patient.
1.1.5 Patient input
In addition to entering patient information in patient management, you can also directly click on the “Patient Entry” menu in the triage management program, enter patient information in the opened patient entry interface, and click the “Save” button to complete the patient information entry. After entering, the patient’s queue receipt will be automatically printed. After completion, the next patient information can be entered.
1.1.6 User Management
For safety reasons, the user management function is temporarily not open. Please log in to the system with an administrator account and keep your administrator account safe.
1.1.7 Changing Password
Click the ‘Change Password’ button in the status bar below the triage management system to bring up the password modification interface. After entering the original and new passwords, click ‘Confirm Change’ to complete the password modification.
1.1.8 Switching Users
Click the ‘Switch User’ button in the status bar below the triage management system, and the system will automatically log out and return to the login interface. Simply re-enter your account and password to log back in to the system.
1.1.9 System lockout
Click the ‘System Lock’ button in the status bar below the triage management system, and a password input interface will pop up. After entering the password, click the ‘Lock’ button, and the system will automatically lock. You need to re-enter the password you used to lock before unlocking.
1.2 Large screen display terminal
1.2.1After running the large screen display program, the main interface will automatically open on the expanded large screen.
1.2.2 Right click on the main interface with the mouse, and a right-click menu will pop up, where you can select the [Display] or [Exit] button.
be careful:
In order to prevent the system sound of the computer from interfering with the large screen broadcast during use, it is recommended to set the sound scheme to none in the computer system management.
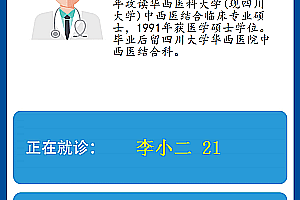
1.3 Doctor Call Terminal
1.3.1 Setting up departments, consultation rooms, and doctors
Click the ‘Settings’ button in the status bar below the main interface to bring up the settings interface. Select the current department, clinic, and doctor in the interface, and click the’ Save ‘button. After saving, you need to close the client and reopen it to make it effective. Otherwise, the patient list cannot be automatically refreshed.
1.3.2 Sequential Call
Click the ‘Next’ button to make a call to the next patient.
1.3.3 Call the current patient again
Click the ‘Call Again’ button to make a new call for the current patient.
1.3.4 Suspension of Reception
If the doctor is temporarily away or unable to receive patients, they can click the ‘Pause’ button to stop receiving patients. After recovery, click the ‘Start’ button to resume receiving patients.
1.3.5 Waiting
If the current patient is unable to receive medical treatment in a timely manner or is temporarily unable to receive medical treatment normally after the call, click the [Wait] button on the right side of the patient information to add the patient to the queue for re queuing. If the patient needs to be called next time, right-click on the patient in the patient list (the color of the patient waiting again is yellow), select the [Call Again] button, and the patient can be called again.
1.3.6 Recall waiting for patient
Right click on the patient in the patient list who is in the process of rebooking and waiting (the color of the patient in the process of rebooking is yellow), and select the [rebooking] button to make a new call for the patient.
1.3.7 Refresh Patient List
Click on the blue ‘Click here to refresh list’ file above the patient list, or right-click on the patient list and click the ‘Refresh’ button to refresh the patient list.